

In The Beginning...
I love beautiful things. There’s very little in the world that takes my breath away quite like an object that was lovingly crafted, built with care and passion, and presented with the sort of pride that befits a marvelously well-made item. Take a look at some of my earlier pieces, then shop around for my latest.
Portfolio
Take a look at the past rings I've produced and notice
how the quality has improved from the beginning until now...
Our Signature Ring

First Ring Wood
This one was made out of a wood dowel. I drilled out the finger hole using a drill bit which I will admit, was a little off center. I had no good way of centering it so I took an educated guess. It took a good bit of sanding and eye balling back and forth, but I finally got it. I had no ring sizers at the time either and once I finally got that set, I checked and it wound up being a size 3.
My 9 yr old granddaughter came to me the other day and told me she needed a wedding ring for one of her school friends who was doing a "mock wedding" so I gave her this one. She brought it back to me the next day because apparently, her friend caught his girl with another boy.
Needless to say, the wedding was called off!
For the photo shoot I used bark chips from our yard and a couple of branches I had laying around the shop and a small studio light.

Ring 2 Wood
For this one I used an actual tree branch and a drill bit to cut the inside finger hole. The branch was mostly round, but not perfectly so I had to do a lot of sanding to get it as close to perfect as possible. I left the bark on it and as I sanded it down, it left some pretty cool looking bark characteristics. I finished off this design by smashing up some amethyst that we had on hand and topped it off with a chip in the center, sanding it a bit to shine it up a little. We have a couple of February birthdays in our family.
For the photo shoot I used bark chips from our yard and a big amethyst rock and a small studio light .

Ring 3 Wood
Similar to Ring 2 but without the amethyst chip. I was also experimenting with ring hole tapering and there is just a little bit less on this design. Slightly different bark characteristics.
For the photo shoot I used bark chips from our yard and a big amethyst rock and a small studio light .

Ring 4 Wood
There is a strong Christian theme to a lot of our rings. This was my first attempt at making a Cross Ring. I didn't yet have a wood burning set so I heated up a flat tip screwdriver in our LP gas heater and pressed it against the wood. It worked fairly well. The wood came from an old broom handle, basically a wood dowel.
For the photo shoot, I used bark chips from around our yard and added a bible in the background and a small studio light off to the left.

Ring 5 Wood
Similar to Ring 2 but without the amethyst chip. I was also experimenting with ring hole tapering and there is just a little bit less on this design. A patch of bark was used as the center piece with the rest of the ring being completely sanded down.
For the photo shoot, I used bark chips from around our yard along with a few dried pine needles, a big amethyst rock and a small studio light off to the left.

Ring 6 Wood
For this one I used a cherry tree branch. The piece was completely sanded down with a bark strip from our cherry tree wrapped all the way around.
For the photo shoot, I used bark chips from around our yard along with a few dried pine needles, a big amethyst rock and a small studio light off to the left.

Ring 7 Wood
For this one I used the same cherry tree branch as Ring 6. I carved out a groove in the center and filled it with crushed amethyst then sanded it all down. I left the finish dull.
For the photo shoot, I used bark chips from around our yard, a big chunk of amethyst, and a small studio light off to the left.

Ring 8 Wood
This one was from a pine tree branch in our yard. It had random markings on it from the natural grain which I highlighted with a little walnut stain then I sanded it down.
For the photo shoot, I used bark chips from around our yard, scattered a few dried pine needles around and a small studio light off to the left. Natural light from out kitchen window filled the background.

Ring 9 Wood
About this time I finally received my "hole saw set" so I cut this one out of an old pallet. Sanded it down, gave it a walnut stain then buffed it to a high gloss.
For the photo shoot, I hung it on a green branch in our yard catching the bright sunlight to emphasize the gloss.

Ring 10 Wood
Once again I used my hole saw and cut this one out of a pallet. I made this one custom for someone that never claimed it. That's just how some people are I guess.
For the photo shoot, I used bark chips from around our yard and propped it up on a rock that somewhat resembles a finger.

Ring 11 Wood
I finally got my wood burning kit so I used my hole saw to trim up a branch we found along the river, I don't have a lathe yet, sanded it down then burned markings in it resembling bark. I drilled a small hole in the center to accommodate the simulated diamond. Then I polished it to a high gloss.
For the photo shoot, I propped up a big rock in our front yard facing the mid-day sun.

Ring 12 Wood
"Crown of Thorns". I made another simple cut from pallet wood, sanded it down, then used my wood burner to burn symbolic thorns in it representing the crown of thorns that Jesus wore when he was crucified.
For the photo shoot, I used smaller bark chips in the center of a hollowed out stump in our back yard.

Ring 13 Wood
I cut this one from pallet wood, sanded it down drilling a small hole in the center and added an imitation diamond. Then I went around the rest of the ring with my wood burner simulating a bark accent.
For the photo shoot, I hung it on a green branch in our yard catching the bright sunlight to emphasize the gemstone.

Ring 14 Wood
For this one I used a branch we found along the river, cut out the center using a drill bit, then meticulously sanded the outer perimeter making it smooth and round. Then, using my home made sanding pad in my drill, I sanded flat edges all around the ring. I drilled a center hole and attached the artificial gemstone.
For the photo shoot, I hung it on a larger green branch in our yard, using less direct sunlight to better emphasize the green gemstone.

Ring 15 Resin
This is when I started working with resin.
I took a thin bark strip and set it inside a resin mold. I colored the resin with a light blue/green food coloring tint then poured the resin. With resin, the most time is dedicated to waiting for the resin to dry. I allow 24 hours just to make sure it cures properly. A little light sanding to even up the outside edges is usually all it takes. It's rare that a molded ring comes out perfectly on both sides. Then I polish it to a high gloss.
For the photo shoot, my daughter found a dirt mound and placed it in. The positioning of the sun brings out the true beauty of this ring.

Ring 16 Resin
With this one, I colored the resin purple by combining red & blue food coloring then poured the resin. With resin, the most time is dedicated to waiting for the resin to dry. I allow 24 hours just to make sure it cures properly. A little light sanding to even up the outside edges is usually all it takes. It's rare that a molded ring comes out perfectly on both sides. Then I polish it to a high gloss. This style has faceted edges.
For the photo shoot, I used smaller bark chips in the center of a hollowed out stump in our back yard.

Ring 17 Resin
With this one, I colored the resin purple by combining red & blue food coloring then poured the resin. With resin, the most time is dedicated to waiting for the resin to dry. I allow 24 hours just to make sure it cures properly. A little light sanding to even up the outside edges is usually all it takes. It's rare that a molded ring comes out perfectly on both sides. Then I polish it to a high gloss. This style has smoothe edges.
For the photo shoot, I used smaller bark chips in the center of a hollowed out stump in our back yard.

Ring 18 Resin
With this one, I colored the resin light blue / green by using blue food coloring then poured the resin. With resin, the most time is dedicated to waiting for the resin to dry. I allow 24 hours just to make sure it cures properly. A little light sanding to even up the outside edges is usually all it takes. It's rare that a molded ring comes out perfectly on both sides. Then I polish it to a high gloss. This style has smooth edges.
For the photo shoot, I used smaller bark chips in the center of a hollowed out stump in our back yard.

Ring 19 Resin
With this one, I colored the resin light blue / green by using blue food coloring then poured the resin. With resin, the most time is dedicated to waiting for the resin to dry. I allow 24 hours just to make sure it cures properly. A little light sanding to even up the outside edges is usually all it takes. It's rare that a molded ring comes out perfectly on both sides. Then I polish it to a high gloss. This style has faceted edges.
For the photo shoot, I used smaller bark chips in the center of a hollowed out stump in our back yard.

Ring 20 Resin
With this one, I colored the resin light blue / green by using blue food coloring then poured the resin. With resin, the most time is dedicated to waiting for the resin to dry. I allow 24 hours just to make sure it cures properly. A little light sanding to even up the outside edges is usually all it takes. It's rare that a molded ring comes out perfectly on both sides. Then I polish it to a high gloss. This style has smooth edges.
For the photo shoot, I used smaller bark chips in the center of a hollowed out stump in our back yard.

Ring 21 Resin
With this one, I colored the resin red by using red food coloring then poured the resin. With resin, the most time is dedicated to waiting for the resin to dry. I allow 24 hours just to make sure it cures properly. A little light sanding to even up the outside edges is usually all it takes. It's rare that a molded ring comes out perfectly on both sides. Then I polish it to a high gloss. This style has faceted edges.
For the photo shoot, I used smaller bark chips in the center of a hollowed out stump in our back yard.

Ring 22 Resin
With this one, I used no food coloring then poured the resin. With resin, the most time is dedicated to waiting for the resin to dry. I allow 24 hours just to make sure it cures properly. A little light sanding to even up the outside edges is usually all it takes. It's rare that a molded ring comes out perfectly on both sides. Then I polish it to a high gloss. This style has smooth edges.
For the photo shoot, I used smaller bark chips in the center of a hollowed out stump in our back yard.

Ring 23 Combo
I took a thin bark strip and set it inside a resin mold. I left the resin clear to show the bark strip then poured the resin. With resin, the most time is dedicated to waiting for the resin to dry. I allow 24 hours just to make sure it cures properly. A little light sanding to even up the outside edges is usually all it takes. It's rare that a molded ring comes out perfectly on both sides. Then I polish it to a high gloss.
For the photo shoot, I used smaller bark chips in the center of a hollowed out stump in our back yard.
Ring 24 Combo
For this one I created a bent wood ring, sanded it down then cut a groove in the middle and gave it a walnut stain. I then took a little of my granddaughter's yellow clay and filled the groove and smoothed it down. I finished it off with a high gloss.
For the photo shoot, I used smaller bark chips in the center of a hollowed out stump in our back yard.

Ring 25 100% Bark Strips
For this one I shaved some bark strips off one of the trees in our back yard. I worked it the same way I would a normal bent wood ring. I shaped it by wrapping it around one of my sockets then I sanded it down. I finished it off with a medium gloss.
For the photo shoot, I used smaller bark chips in the center of a hollowed out stump in our back yard.

Ring 26 Bent Wood Cross
This is actually my 2nd cross ring. I used the bent wood method on this one. It came out even better than my first one. I carved out a cross in the middle using an exacto knife then filled it with brown clay of my granddaughter's. I sanded it down and gave it a high gloss. I actually wear an example of this one myself.
For the photo shoot, I used smaller bark chips in the center of a hollowed out stump in our back yard.

Ring 27 & 28 Set
This is a set of rings that I actually cracked by accident in my earlier production days. I learned a few tricks since I started doing this and I was able to repair them and they actually came out pretty nice!
For the photo shoot, I used smaller bark chips in the center of a hollowed out stump in our back yard.

Ring 29 Triple Combo
This one took some time... I combined 3 methods for this one, wood, resin, and sterling silver. I had 2 rings so I made one to sell and I kept 1 for myself because I liked it so much. I made a bent wood base then carved out the spaces to hold the sterling silver. I stained the base walnut then buffed it up a little. The original ring was actually smaller than the final ring so when I cut it in half it left a gap on either side that needed to be filled. After cutting the sterling ring in half I mounted it on the new wood base. I filled the gaps with flat leather string. I brushed resin over the entire ring and then let it dry for 24 hours.
For the photo shoot, I used smaller bark chips in the center of a hollowed out stump in our back yard.

Ring 30 Combo
I got this ring by combining Ring 23 and bentwood. I created my usual bent wood ring, then I cut it in half, making 3 pieces to work with. I attached all 3 pieces as shown in the image then buffed them to a high gloss.
For the photo shoot, I used smaller bark chips in the center of a hollowed out stump in our back yard.

Ring 31 100% Bark
I made this ring out of 100% bark strips. Since the branch I used was already laying on the ground, I wasn't able to identify the type of tree it was from.
For the photo shoot, I used smaller bark chips in the center of a hollowed out stump in our back yard.

Ring 32 100% Bark
I made this ring out of 100% bark strips. Since the branch I used was already laying on the ground, I wasn't able to identify the type of tree it was from.
For the photo shoot, I used smaller bark chips in the center of a hollowed out stump in our back yard.

Ring 33 100% Bark
I made this ring out of 100% bark strips. Since the branch I used was already laying on the ground, I wasn't able to identify the type of tree it was from.
For the photo shoot, I used smaller bark chips in the center of a hollowed out stump in our back yard.

Ring 34 100% Bark
I made this ring out of 100% bark strips. Since the branch I used was already laying on the ground, I wasn't able to identify the type of tree it was from.
For the photo shoot, I used smaller bark chips in the center of a hollowed out stump in our back yard.

Ring 35 100% Bark, Gemstone
I made this ring for my daughter's birthday out of 100% bark strips and included a fake gemstone I had lying around. I wish I could have used a real stone. Since the branch I used was already laying on the ground, I wasn't able to identify the type of tree it was from.
For the photo shoot, I used smaller bark chips in the center of a hollowed out stump in our back yard.

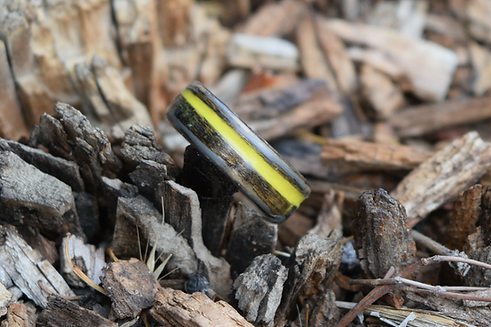
Ring 36 "The Patriot" Ring
This is our Signature Ring. I am a True Patriot myself so I thought this ring was appropriate for what I stand for.
This is the embodiment of the 1776 spirit, meticulously designed in a bark ring, updated for 2023. Display your commitment to America by wearing this ring with dignity! Make it known to all that America symbolizes power and will not be suppressed. Make America Great Again!
For the photo shoot, I used smaller bark chips in the center of a hollowed out stump in our back yard.

Purple Haze 37 Bent Wood & Resin
9/28/2023
I have a few extra resin rings lying around so I tried to get creative. Mix & Match some things and see what we come up with. This is one I came up with today.
For the photo shoot, I used smaller bark chips in the center of a hollowed out stump in our back yard.
I try to produce at least 1 new ring a day, if my schedule allows it.
With kids and grand kids, things tend to pop up without warning.